|
|
 ハニー号
ハニー号
 - 08/6/5 23:12 -
|
|
|
| |
またまたロードマスターで申し訳ないです。
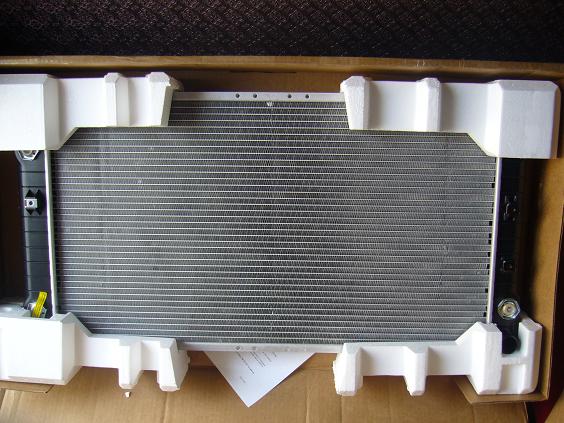
ラジエーターからの水漏れがあり、社外品を輸入して早速取り付け。
『Direct Fit』との事でしたが若干仕様が違いまして、サブタンクからの vent hose(オーバーフローホース?)の取り付け先がありません。
説明書には多分「もしベントホースがあればinlet heater hoseかthrottle body heater outletにティーでつなげ」って書いてあると解釈しまして、その通りに配管したのですが水温が上がりまくり!
っていうかラジエーターに熱いクーラントが流れて行きません。
かなり慌てまして、
1、ラジエーターに直ホースで流水し流量チェック
2、サーモスタット煮沸試験
3、ウォーターポンプ新品交換
をしましたがどれも問題ナシでした。
仕方なく漏れてるラジエーターに戻すと何事もなかったように正常に…
(ここでWAKOSの漏れ止めに登場願いました)
そこで説明書の解釈が間違ってないか気になりまして、原文のまま掲載しますのでどなたか間違いがあればご指摘願います。
(OCRを使ってるので誤字があったらごめんなさい)
The failed radiator being replaced by this new Ready Rad radiator may have a
vent hose connecting the outlet tank to the overflow bottle, which this new radiator
does not require, if your failed radiator does not have this hose connecting the
radiator outlet tank to the overflow bottle, disregard these instrucctions and install
the new radiator in the usual manner.
If your radiator has the vent hose, the hose needs to be plugged at the overflow
bottle. This overflow bottle was connected to the cooling system at three points.
The connection to the top of the outlet tank has been eliminated. There are still two
connections to the cooling system: a tee connection to the inlet heater hose and a
connection to the throttle body heater outlet, so you will fill the system through the
overflow bottle as before. The vent hose was never there to fill the system: it was
designed strictly for overflow. Removing the overflow hose actually helps heater
warm-up performance.
You can complete the installation in the following manner:
1) A10 mm diameter bolt (not included) about 1/2 to 1/3 inches long (12 to 19mm)
Will be used to plug the hose
2) The hose needs to be cut as close as possible to the overflow bottle, still allowing
the 1 Omm diameter bolt to be inserted in the hose to act as plug.
3)Use the clamp that connects the hose to the outlettank on the old radiator
to hold the 1 Omm bolt in place.
4) Make sure there is no excessive movement in the cut hose once it is plugged.
If there is, cut the hose shorter, or attach it to the vehicle with tape or cable tie.

【20080601.JPG : 67.0KB】
|
|
|
<Mozilla/4.0 (compatible; MSIE 6.0; Windows NT 5.1; SV1; .NET CLR 2.0.50727; .N...@p1200-ipbf52sasajima.aichi.ocn.ne.jp>
|
 |
|
|
|
|
|
| |
訳しました。
The failed radiator being replaced by this new Ready Rad radiator may have a
vent hose connecting the outlet tank to the overflow bottle, which this new radiator
does not require, if your failed radiator does not have this hose connecting the
radiator outlet tank to the overflow bottle, disregard these instrucctions and install
the new radiator in the usual manner.
この新しいReadyRadラジエーターと交換される故障したラジエーターには、アウトレットタンクからオーバーフローボトルにつながるベントホースがついているかもしれない、そしてそれはこの新しいラジエーターには必要とされない。もし、壊れたラジエーターがラジエーターアウトレットタンクとオーバーフローボトルをつなぐこのホースを持っていなければ、この説明は無視して、普通に新しいラジエーターをつけてください。
If your radiator has the vent hose, the hose needs to be plugged at the overflow
bottle. This overflow bottle was connected to the cooling system at three points.
The connection to the top of the outlet tank has been eliminated. There are still two
connections to the cooling system: a tee connection to the inlet heater hose and a
connection to the throttle body heater outlet, so you will fill the system through the
overflow bottle as before. The vent hose was never there to fill the system: it was
designed strictly for overflow. Removing the overflow hose actually helps heater
warm-up performance.
もし、あなたのラジエーターがベントホースを持っていたら、そのホースはオーバーフローボトルのところで栓をされる必要がある。オーバーフローボトルは冷却系と3箇所で繋がれている。アウトレットタンクの上部への接続は無効化された。冷却系への接続はまだ2箇所残っている。インレットヒーターホースへのT接続とスロットルボディーヒーターアウトレットへの接続である、だからあなたは以前と同様にオーバーフローボトルから系に給水することができる。ベントホースは系へ給水するためのものではない。厳密にオーバーフローのためにデザインされたものだ。オーバーフローホースの除去は実のところヒーターのウォーミングアップの性能を向上させる。
You can complete the installation in the following manner:
1) A10 mm diameter bolt (not included) about 1/2 to 1/3 inches long (12 to 19mm)
Will be used to plug the hose
2) The hose needs to be cut as close as possible to the overflow bottle, still allowing
the 1 Omm diameter bolt to be inserted in the hose to act as plug.
3)Use the clamp that connects the hose to the outlettank on the old radiator
to hold the 1 Omm bolt in place.
4) Make sure there is no excessive movement in the cut hose once it is plugged.
If there is, cut the hose shorter, or attach it to the vehicle with tape or cable tie.
インストールは以下の方法によりできる。
1)10mm系のボルト(同梱されていない)1/2インチから1/3インチ長(12から19mm)
ホースを栓するのに使う
2)ホースはできるだけオーバーフローボトルに近いところでカットする、ただし10mm径ボルトがまだ栓として機能するように入れられるくらいのところで
3)アウトレットタンクへのホースと古いラジエーターを接続するのに使われていたクランプを10mm径ボルトを固定するのに使え
4)切断したホースは一度栓をしたら余計に動かないようにしろ。もし動くようであれば、さらに短くしろ、あるいはテープかケーブルタイで固定しろ。
実物見ていないのでなんともいえませんが、読んだだけだと、ラジエーターのリザーバタンクに行くホースを使わないで栓をするだけ、残りはそのまま繋げ、のように読めるんですが。。。。
|
|
|
<Mozilla/5.0 (Windows; U; Windows NT 5.1; en-US; rv:1.8.1.14) Gecko/20080404 Fi...@c-24-13-238-85.hsd1.il.comcast.net>
|
 |
|
|
|
|
|
 ハニー号
ハニー号
 - 08/6/6 1:28 -
|
|
|
| |
▼KIDさん:
>訳しました。
>実物見ていないのでなんともいえませんが、読んだだけだと、ラジエーターのリザーバタンクに行くホースを使わないで栓をするだけ、残りはそのまま繋げ、のように読めるんですが。。。。
いつもいつもありがとうございます。
あぁ、そっちでしたか…と言いたいところですが、実はそれも最初に試してるんです(ToT)
どうも今入った情報だと『リザーブからの3ポートタイプ』は過去のもので、
更に高年式になると『2ポートタイプ』に改良されてるそうな…(未確)
2ポートはベントホースが無いだけなんだから、ラジエーターに高温のクーラントが廻らない理由が分からんです。
たまたま『質の悪い品』だったと踏ん切りをつけましょうか…
本当は冷却系に漏れ止め剤は使いたくなかったんですが、今はWAKOS様々です。
|
|
|
<Mozilla/4.0 (compatible; MSIE 6.0; Windows NT 5.1; SV1; .NET CLR 2.0.50727; .N...@p1200-ipbf52sasajima.aichi.ocn.ne.jp>
|
|
|
| |
▼ハニー号さん:
>いつもいつもありがとうございます。
>あぁ、そっちでしたか…と言いたいところですが、実はそれも最初に試してるんです(ToT)
>どうも今入った情報だと『リザーブからの3ポートタイプ』は過去のもので、
>更に高年式になると『2ポートタイプ』に改良されてるそうな…(未確)
>2ポートはベントホースが無いだけなんだから、ラジエーターに高温のクーラントが廻らない理由が分からんです。
>
流れないんですか?
ラジエーターがあったまるけど水温が下がらないのか、ラジエーターも温まらないのか?
困りましたね。。。。
|
|
|
<Mozilla/5.0 (Windows; U; Windows NT 5.1; en-US; rv:1.8.1.14) Gecko/20080404 Fi...@c-24-13-238-85.hsd1.il.comcast.net>
|
|
 |
 |


